After an interesting week that included one of my smartplugs failing (turning on a loud fan at midnight) I’m pleased to say the above-named plug has arrived. The troublesome plug was a Meross MSS310 – though as it turns out, after I decided to investigate cosmic rays, the supposedly duff plug may well have falled victim to one of these rays as I pulled it out of the bin and could find absolutely nothing wrong with it – after years of good service it’s back to accurately timing the fan 3 times a day NOT including midnight.
There’s a reason NASA use 3 computers on the space station when one would do… and it seems though we’re well protected from these dangerous rays here at sea level or thereabouts (our place is 900 metres above sea level), they can and DO occasionally end up bit-flipping complex microcontrollers – even our supercomputers are not totally immune – just needs one bit out of billions to get flipped and you can end up with a bad result – in my case a fan coming on when it should not. However I’ve been unable to duplicate any error.

Meanwhile I sent off to AliExpress for a cheap smart plug and learned a lot in the process. Athom make not-particularly-cheap but good Tasmota (or ESP-home) based smartplugs and I’ve lots of good experience with them. I noticed while looking at the Aliexpress ad that the name of the cheap plug is Iotorero. I also noticed the word Athom in the photo and tackled Athom – it turns out they’ve renamed the company though the brand name Athom is EVERYWHERE. Not sure about that but it’s not my business.
So, the plug arrived by normal post today here in Spain only days after ordering it. The box reminds me of the original Athom boxing – but in this case it states that this is the IoTorero PG01 plug, 100-250v – rated current – well, 10 or 16A, no-one ticked the relevant box, same with power monitoring – could be or not. Standard 2.4Ghz WiFi, 0-40c working. Tasmota inside. Manufacturer Shenzhen Jiwu Co., Ltd.
Enough waffle – lets get on with it. Power up, light on the button alternates blue and purple (lights on the button are red and blue)… That means it’s in pairing mode. I set my phone looking for a tasmota-xxxx-xxx access point and sure enough, it’s there…. connect – look for address 192.168.4.1 in the phone browser – in. Erm, not so quick. Turn off mobile data and my Tailscale VPN – IN. The normal Tasmota web interface appeared at 192.168.4.1 and I entered my nearest 2.4Ghz Wifi access point. From there the page refreshed and I could see that the plug was on my network. I long ago learned that the easiest way from there on in is to complete the setup on my PC.
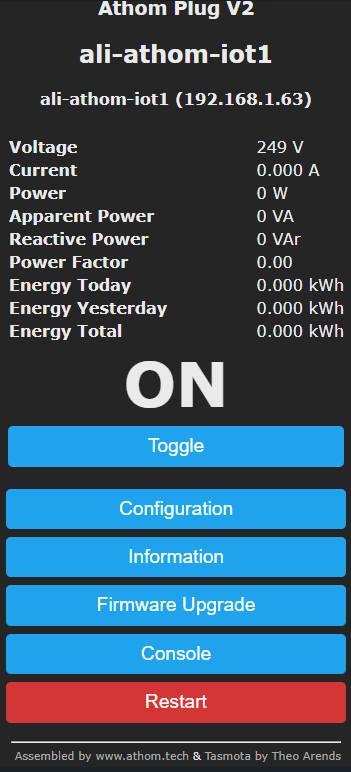
As you can see the unit has the standard Tasmota web interface and here I’ve already set it up… In case you don’t know, Tasmota is all local, none of this cloud stuff. So how would I use this from a distance? Well, having verified the unit was working and having completed the setup via the CONSOLE option (see below), on my PC by injecting the info in that block below (all in one line) at the console… I turned my phone WiFi back on, VPN back on and…
I didn’t always do the setup like this but since grasping use of the Tasmota console and the backlog command… all the setup for this device was done in one line including the most meaningful name I could think of on-the-spot for my MQTT broker topic, hostname and friendlyname etc..
backlog ssid1 noname; password1 zzzzzzzz; mqtthost 192.168.1.20; mqttuser admin; mqttpassword Xxxxxxxx; topic ali-athom-iot1; hostname ali-athom-iot1; devicename ali-athom-iot1; friendlyname ali-athom-iot1; so53 1; timezone 99; status 5;
All done… it IS power monitoring for I think just under 11 Euros ALL IN, not bad. The next thing to do was to find out if this is old or new…. and that’s what the information page is for. The chip is an ESP8266EX with 2048KB of FLASH. Dooe enough for what this does – you’re not going to be sticking all sorts of sensors on it as it is sealed. Tasmota 10.1 – well, I couldn’t be having that, so in at the deep end, I went off to the update page FIRMWARE UPGRADE and simply hit the top UPGRADE button. You have to be patient as it does a 2-part online upgrade.
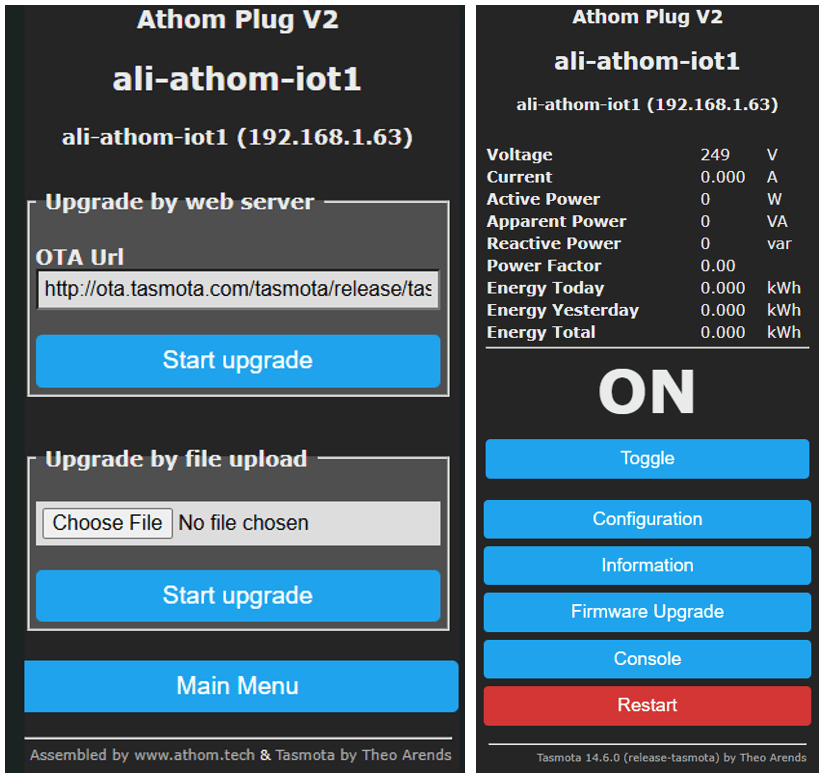
Suer enough – 5 minutes after I started the upgrade, time used to write this explanation, the device was bang up to date at v14.6. (I did have to hit refresh on my browser to get the final page but that’s quite normal). Ok the reference to Athom had disappeared at the bottom but all my settings etc., all intact.
In the configuration page you can see the device MAC address and it’s not a bad idea assuming your router will allow for ADDRESS RESERVATIONS, putting both MAC and IP in the router so the IP doesn’t change in time in case like me you’re using a VPN which may not take kindly to using friendlynames remotely.
So, fully local smart plug solution, cheap… meanwhile Athom are sending me some of their NEW smartplugs I’m guessing based on ESP32. More on that soon. No mention on this device of the relay size – 10A or 16A but on my order the info specifically says 16A. As usual I’ll remind everyone reading that this means 16A MAX non-inductive load. I’d be sticking to maybe 10A max to be on the safe side. But at 250v that’s 2.5KW.
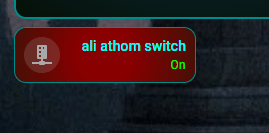
You COULD push it to 3KW but do that at your own risk. I run my 2KW hot water tanks on a pair of 16A smartplugs… no problems at all. On the right – you’re looking at this plug in Home Assistant thanks to the Tasmota integration, it just APPEARED. And of course you COULD set up timers in Tsmota – I believe 16 of them with times and sunrise/sunset, offsets etc. So 8 on-off sequences in a day.